This tutorial describes how to install Apache, MariaDB, and PHP (FAMP) stack in FreeBSD 10.2. As you probably know, FAMP is the acronym of FreeBSD, Apache, MySQL/MariaDB, PHP.
For the purpose of this tutorial, I will be using the following test machine.
- Operating system: FreeBSD 10.2 64 bit system
- Hostname: freebsd.ostechnix.local
- IP Address: 192.168.1.103/24
Well, now let us start to deploy FAMP stack on FreeBSD 10.2.
Table of Contents
1. Update your FreeBSD
Like any other operating system, we must update FreeBSD before installing any software. To do so, switch to root user:
$ su
And run the following commands one by one to update your FreeBSD server:
# freebsd-update fetch
# freebsd-update install
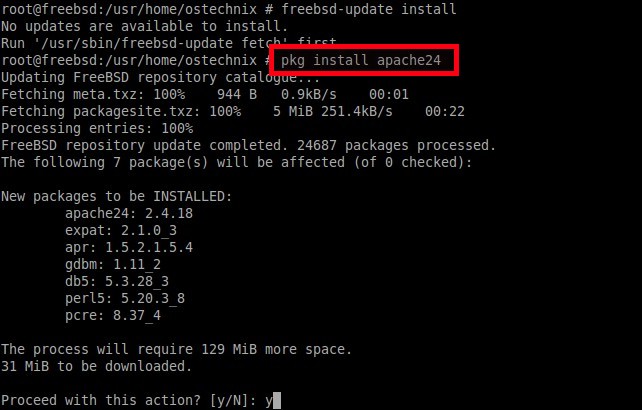
2. Install Apache
Install Apache web server using command:
# pkg install apache24
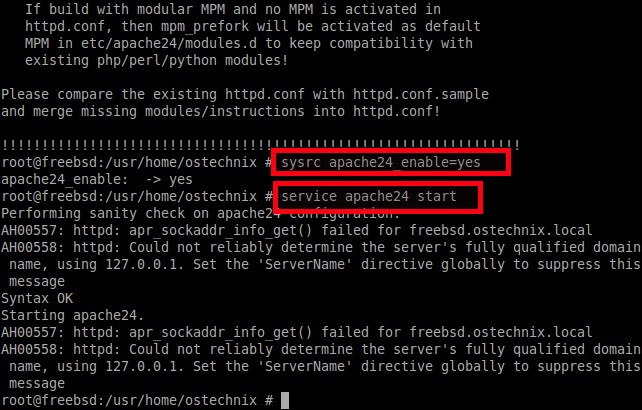
Next, we need to enable and start Apache service. To do so, run:
# sysrc apache24_enable=yes
# service apache24 start
Test Apache web service
We have installed Apache web server. Now, we will test whether it's working or not.
To do so, edit the Apache configuration file /usr/local/etc/apache24/httpd.conf.
# nano /usr/local/etc/apache24/httpd.conf
Find the following lines and change them as shown below. Replace them with your own values.
[...]
ServerAdmin ostechnix@ostechnix.local
.
.
.
ServerName localhost:80
[...]
Then, create a sample HTML file in the Apache root directory as shown below.
# nano /usr/local/www/apache24/data/index.html
Add the following contents:
<html>
<title>CONGRATULATIONS</title>
<body>
<h2>Welcome OSTechNix web server</h2>
</body>
</html>
Restart Apache web service.
# service apache24 restart
Sample output:
Performing sanity check on apache24 configuration:
Syntax OK
Stopping apache24.
Waiting for PIDS: 3265.
Performing sanity check on apache24 configuration:
Syntax OK
Starting apache24.
Now, open your web browser and navigate to: http://IP-address/ or http://localhost/. You'll see the following Apache test page.
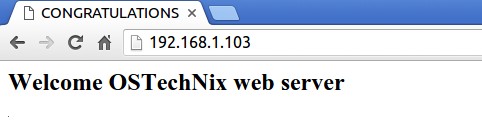
Congratulations! Apache web server is working.
3. Install MariaDB
MariaDB is drop-in replacement of MySQL. To install MariaDB, run:
# pkg install mariadb100-server

Next, copy MariaDB configuration file from directory '/usr/local/share/mysql/' to '/usr/local/etc/' as shown below.
# cp /usr/local/share/mysql/my-medium.cnf /usr/local/etc/my.cnf
Then, enable and start MariaDB service using commands:
# sysrc mysql_enable=yes
# service mysql-server start
Setup MariaDB root user password
As you probably know, MariaDB root user has empty, which is not recommended, at the time of installation. So to secure MariaDB root user, it is mandatory to setup a strong password for the root user. To do so, run:
# mysql_secure_installation
When prompt "Enter current password for root", just press ENTER key and set the password twice. Then simply press Y to accept the default values.
Sample output:
NOTE: RUNNING ALL PARTS OF THIS SCRIPT IS RECOMMENDED FOR ALL MariaDB
 SERVERS IN PRODUCTION USE! PLEASE READ EACH STEP CAREFULLY!

In order to log into MariaDB to secure it, we'll need the current
password for the root user. If you've just installed MariaDB, and
you haven't set the root password yet, the password will be blank,
so you should just press enter here.

Enter current password for root (enter for none): ## Press Enter
OK, successfully used password, moving on...

Setting the root password ensures that nobody can log into the MariaDB
root user without the proper authorisation.

Set root password? [Y/n] ## Press Enter

New password: ## Enter password
Re-enter new password: ## Re-enter password
Password updated successfully!
Reloading privilege tables..
 ... Success!

By default, a MariaDB installation has an anonymous user, allowing anyone
to log into MariaDB without having to have a user account created for
them. This is intended only for testing, and to make the installation
go a bit smoother. You should remove them before moving into a
production environment.

Remove anonymous users? [Y/n] ## Press Enter
 ... Success!

Normally, root should only be allowed to connect from 'localhost'. This
ensures that someone cannot guess at the root password from the network.

Disallow root login remotely? [Y/n] ## Press Enter
 ... Success!

By default, MariaDB comes with a database named 'test' that anyone can
access. This is also intended only for testing, and should be removed
before moving into a production environment.

Remove test database and access to it? [Y/n] ## Press Enter
 - Dropping test database...
 ... Success!
 - Removing privileges on test database...
 ... Success!

Reloading the privilege tables will ensure that all changes made so far
will take effect immediately.

Reload privilege tables now? [Y/n] ## Press Enter
 ... Success!

Cleaning up...

All done! If you've completed all of the above steps, your MariaDB
installation should now be secure.

Thanks for using MariaDB!
That's it. MariaDB is installed and secured now. Let us go ahead and install PHP.
4. Install PHP
To install PHP, run:
# pkg install mod_php56 php56-mysql php56-mysqli

After installing PHP, copy the sample PHP configuration file /usr/local/etc/php.ini-production to /usr/local/etc/ directory as shown below.
# cp /usr/local/etc/php.ini-production /usr/local/etc/php.ini
To update the changes, run:
# rehash
Now, we need to configure PHP with Apache web server. To do so, edit Apache configuration file:
# nano /usr/local/etc/apache24/httpd.conf
Find the DirectoryIndex section and add index.php in front of the existing index.html as shown below.
[...]

<IfModule dir_module>
 DirectoryIndex index.php index.html
</IfModule>

[...]

And then, add the following lines at the bottom of Apache configuration file:
<FilesMatch "\.php$">
 SetHandler application/x-httpd-php
</FilesMatch>
<FilesMatch "\.phps$">
 SetHandler application/x-httpd-php-source
</FilesMatch>

Save and close the file.
Test PHP
We have installed PHP and configured it to work with Apache web server. Now, let us check whether PHP is working or not. To do so, create a test.php file in the Apache root directory:
# nano /usr/local/www/apache24/data/test.php
Add the following line:
<?php phpinfo(); ?>
Save and close the file.
Restart Apache web server to take effect the changes.
# service apache24 restart
Open up the Web browser and navigate to http://IP-Address/test.php. You'll be greeted with PHP test configuration page.

Install PHP Modules
We need to install PHP modules (extensions) to enhance the functionality of PHP. This is optional, you can skip it if you don't need to install any extensions.
To view the list of available modules, just run:
# pkg search php56

You can verify what each module does from the comment section in the above output, or just run the following command
# pkg search -f php56-curl
Sample output:
php56-curl-5.6.18
Name : php56-curl
Version : 5.6.18
Origin : ftp/php56-curl
Architecture : freebsd:10:x86:64
Prefix : /usr/local
Repository : FreeBSD [pkg+http://pkg.FreeBSD.org/FreeBSD:10:amd64/quarterly]
Categories : ftp
Licenses : PHP301
Maintainer : ale@FreeBSD.org
WWW : http://www.php.net/
Comment : The curl shared extension for php
[...]
To install a PHP extension, for example php56-curl-5.6.18, run:
# pkg install php56-curl
Congratulations! At this stage, FAMP stack is ready to host your websites or any web based applications.
Want to install Nginx instead of Apache web server? then refer the following tutorial:
That's all for now. Thank you for reading this tutorial. If you have any questions, feel free to ask in the comment section below. We will sort it out as soon as possible.
If you find this tutorial useful, please share it on your social networks and support OSTechNix.
Cheers!