This guide explains what is Rsnapshot, how to install Rsnapshot in Linux , and how to setup backup server using Rsnapshot in Linux.
Table of Contents
1. Introduction
Rsnapshot is a filesystem snapshot utility based on rsync for Linux and Unix-like operating systems. It allows you to easily create periodic snapshots of local machines, and remote machines over ssh.
The good thing about rsnapshot is it makes extensive use of hard links whenever possible, to greatly reduce the disk space required.
Since rsnapshot only keeps a fixed number of snapshots, the amount of disk space used will not continuously grow.
Rnapshot is a free, and open source backup application that supports incremental backups. It is written entirely in Perl, and it should work on most Unix-like systems.
Without further ado, let us go ahead and see how to install, configure and setup backup server using Rsnapshot in Linux.
2. Install Rsnapshot in Linux
Rsnapshot is packaged for many Linux distributions.
Install Rsnapshot in Alpine Linux:
$ sudo apk add rsnapshot rsync
Install Rsnapshot is Arch Linux, EndeavourOS and Manjaro Linux:
$ sudo pacman -S rsnapshot rsync
Install Rsnapshot in Debian, Ubuntu, Linux Mint , Pop_OS!:
$ sudo apt install rsnapshot rsync
Install Rsnapshot in CentOS, Fedora, RHEL, AlmaLinux, Rocky Linux:
Rsnapshot is not available in the default repositories of Enterprise operating systems such as CentOS, RHEL, AlmaLinux and Rocky Linux. You need to enable [EPEL] repository in-order to install Rsnapshot.
$ sudo dnf install epel-release
Then, install Rsnapshot using command:
$ sudo dnf install rsnapshot rsync
Install Rsnapshot in openSUSE:
$ sudo zypper install rsnapshot rsync
3. Setup Backup server using Rsnapshot in Linux
For the purpose of this guide, I will be using two test systems.
One is backup server running with AlmaLinux 8 and another one acts as client system. The client is running with Fedora 34 desktop.
The details of backup server and client are given below.
Backup server:
- OS : AlmaLinux 8 64 bit minimal system
- IP address : 192.168.122.25/24
- Rsnapshot root directory : /rsnapbackup
- Directory to backup : /home/ostechnix/data/
Client :
- OS : Fedora Workstation 34
- IP address : 192.168.225.37/24
- Directory to backup : /home/sk/data/
3.1. Setup Password-less SSH authentication in backup server
To backup files of a remote client system over SSH, you need to setup password-less SSH authentication for remote client systems, so backup will automatically connect to the client system without a password and backup the client data.
Log in as root user and create SSH key pair in our Backup server system.
# ssh-keygen
Do not enter any passphrase, because we want these systems to be able to connect to each other without any user intervention:
Generating public/private rsa key pair.
Enter file in which to save the key (/root/.ssh/id_rsa):
Enter passphrase (empty for no passphrase):
Enter same passphrase again:
Your identification has been saved in /root/.ssh/id_rsa.
Your public key has been saved in /root/.ssh/id_rsa.pub.
The key fingerprint is:
SHA256:k/yIpwuk2lqEVxW4O0/6evTjquxCcGffQU0Kgm1ZvPk root@alma8
The key's randomart image is:
+---[RSA 3072]----+
|   o.==. o.      |
|  . =o.....      |
|   ... +.        |
|....+ o...       |
|.ooo.o oS.       |
| o.oo +.E+       |
| .o .*..o .      |
| +....ooo        |
|o..o===+..       |
+----[SHA256]-----+
Next, copy the SSH public key to your all remote client systems.
# ssh-copy-id sk@192.168.225.37
Replace sk and 192.168.225.37 in the above command with your remote system's username and IP address. Enter your client system user password to copy the public key file:
/usr/bin/ssh-copy-id: INFO: Source of key(s) to be installed: "/root/.ssh/id_rsa.pub"
/usr/bin/ssh-copy-id: INFO: attempting to log in with the new key(s), to filter out any that are already installed
/usr/bin/ssh-copy-id: INFO: 1 key(s) remain to be installed -- if you are prompted now it is to install the new keys
sk@192.168.225.37's password:

Number of key(s) added: 1

Now try logging into the machine, with:   "ssh 'sk@192.168.225.37'"
and check to make sure that only the key(s) you wanted were added.
Here, 192.168.225.37 is the IP address of my remote client system (i.e. Fedora Desktop).
Now you can ssh into the client system without any password.
Repeat the above command to copy the ssh public key to all your client systems to setup password-less authentication.
Next, we need to configure Backup server.
3.2. Rsnapshot backup server configuration
Create Root backup directory to save all backups of your server and client systems.
For the purpose of this guide, I use /rsnapbackup/ as the root backup directory. It is the directory where I am going to store all backups.
You can define your own location of your choice to store the backups.
Let us create the Root backup directory in our backup server with command:
# mkdir /rsnapbackup
Next we need to edit and update Root backup directory, the directories you want to backup, and backup intervals in Rsnapshot default configuration file /etc/rsnapshot.conf.
Before editing the configuration, it is always recommended to make a backup of the default config file in case you need to reconfigure rsnapshot again.
# cp /etc/rsnapshot.conf /etc/rsnapshot.conf.bak
Now, edit rsnapshot config file using command:
# nano /etc/rsnapshot.conf
The default configuration should just work fine. All you need to do is just define the backup directories and backup intervals.
Heads Up: Please note that you should specify a trailing slash at the end of the directory names in /etc/rsnapshot.conf file. Say for example, you must specify the directory name as /rsnapbackup/, but not /rsnapbackup. Also, you need to use tabs (not spaces) between elements/fields.
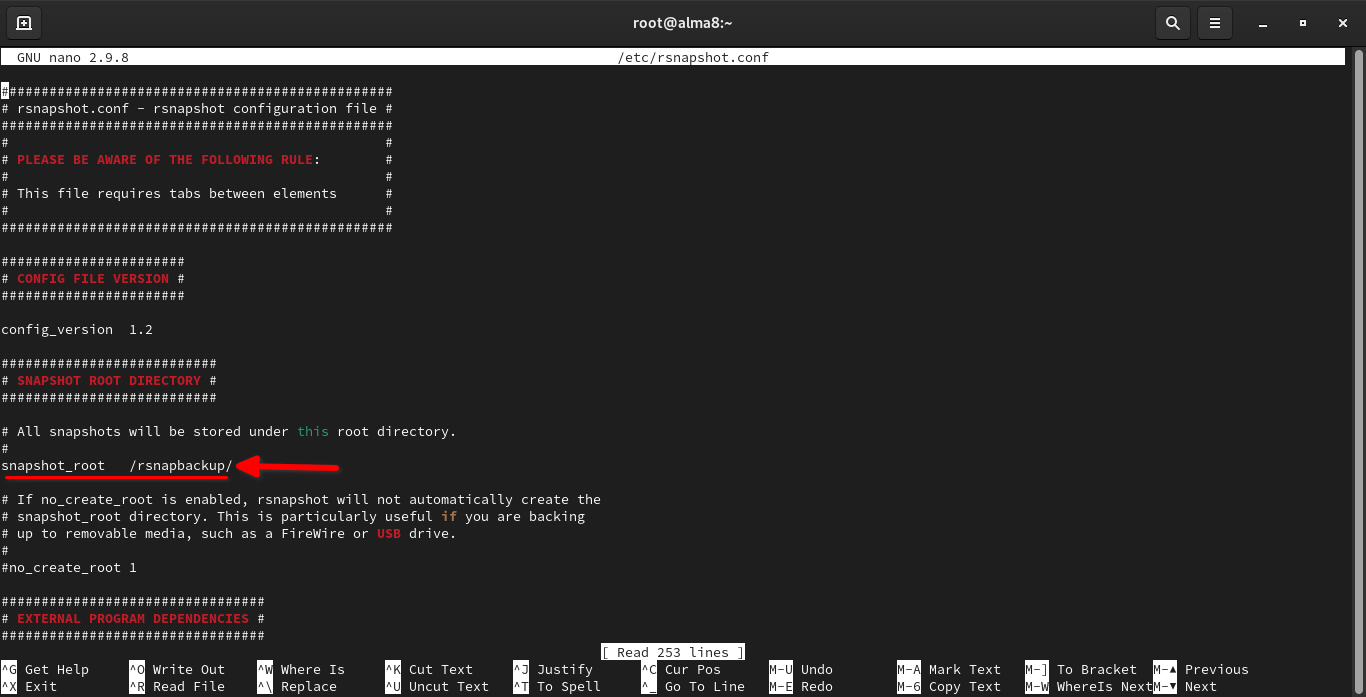
First, let us setup the Root backup directory i.e define the directory where we want to store the file system back ups. In our case, I will store the backups in /rsnapbackup/ directory.
# All snapshots will be stored under this root directory.
#
snapshot_root   /rsnapbackup/
Again, you should use TAB key between snapshot_root element and your backup directory.
Note: Rsnapshot does not support a remote snapshot root via SSH.
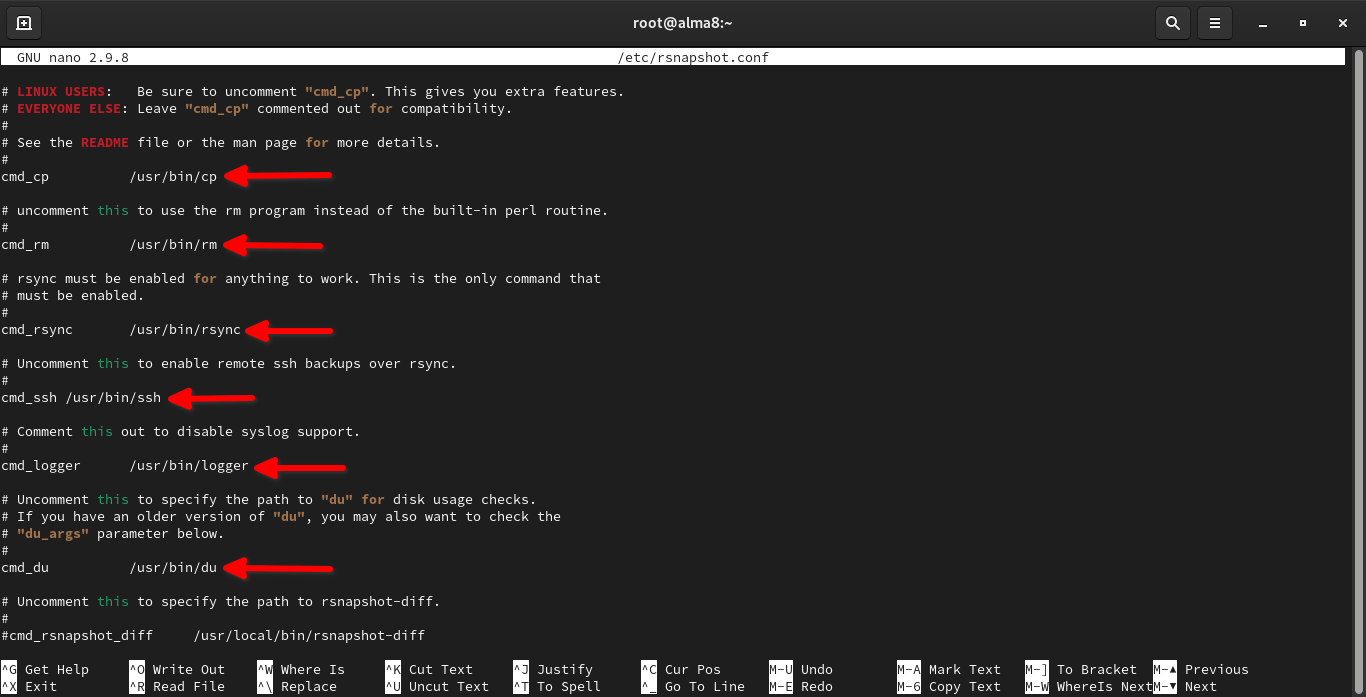
Scroll down a bit, and make sure the following lines (marked in bold) are uncommented:
[...]
#################################
# EXTERNAL PROGRAM DEPENDENCIES #
#################################

# LINUX USERS: Be sure to uncomment "cmd_cp". This gives you extra features.
# EVERYONE ELSE: Leave "cmd_cp" commented out for compatibility.
#
# See the README file or the man page for more details.
#
cmd_cp /usr/bin/cp

# uncomment this to use the rm program instead of the built-in perl routine.
#
cmd_rm /usr/bin/rm

# rsync must be enabled for anything to work. This is the only command that
# must be enabled.
#
cmd_rsync /usr/bin/rsync

# Uncomment this to enable remote ssh backups over rsync.
#
cmd_ssh /usr/bin/ssh

# Comment this out to disable syslog support.
#
cmd_logger /usr/bin/logger

# Uncomment this to specify the path to "du" for disk usage checks.
# If you have an older version of "du", you may also want to check the
# "du_args" parameter below.
#
cmd_du /usr/bin/du

[...]
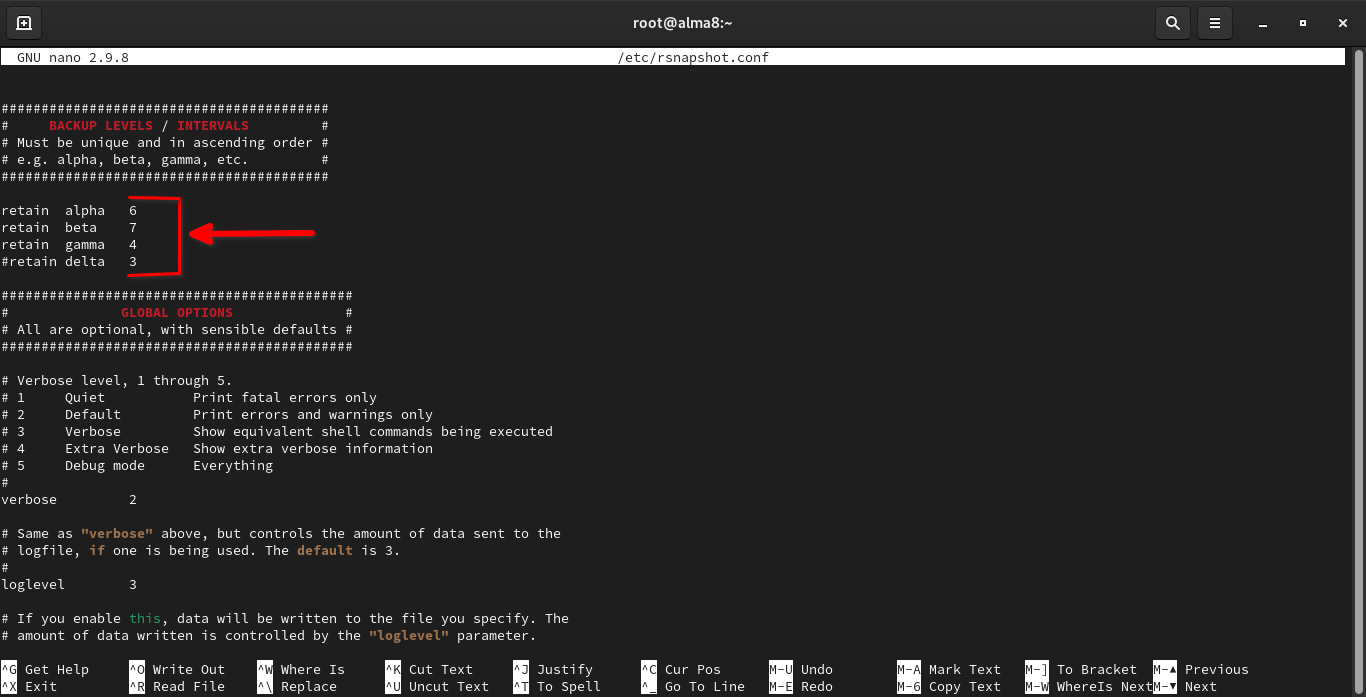
Next, we need to define the backup intervals:
#########################################
# BACKUP LEVELS / INTERVALS #
# Must be unique and in ascending order #
# e.g. alpha, beta, gamma, etc. #
#########################################

retain alpha 6
retain beta 7
retain gamma 4
#retain delta 3
Here, retain alpha 6 means that every time rsnapshot alpha run, it will make a new snapshot, rotate the old ones, and retain the most recent six backups in the directories named alpha.0, alpha.1,... alpha.5 in Rsnapshot root directory. Then the next time the command is run, the alpha.5 directory will be deleted.
Similarly, when we call rsnapshot beta each time, it will create new snapshot, rotate old ones and retain most recent 7 backups (delta.0 - delta.6)
Please note that the alpha, beta, gamma, and delta are just the names to define the backup intervals. You can also define your own intervals.
For instance, you can replace the default backup levels with some meaningful names of your choice like below:
retain  hourly  24
retain  daily   7
retain  weekly  4
retain  monthly 12
When we call rnsapshot hourly, it will create a new backup in <rsnapshot-root>/hourly.0/ directory. When you run this command each time, it will keep creating new directories up to <rsnapshot-root>/hourly.23/.
This is same for daily, weekly and monthly backups.
Next, uncoment the following line if you want to set the logfile for Rsnapshot:
logfile /var/log/rsnapshot
If you have changed SSH default port, you need to uncomment this line and mention the valid port number here:
ssh_args -p 2222
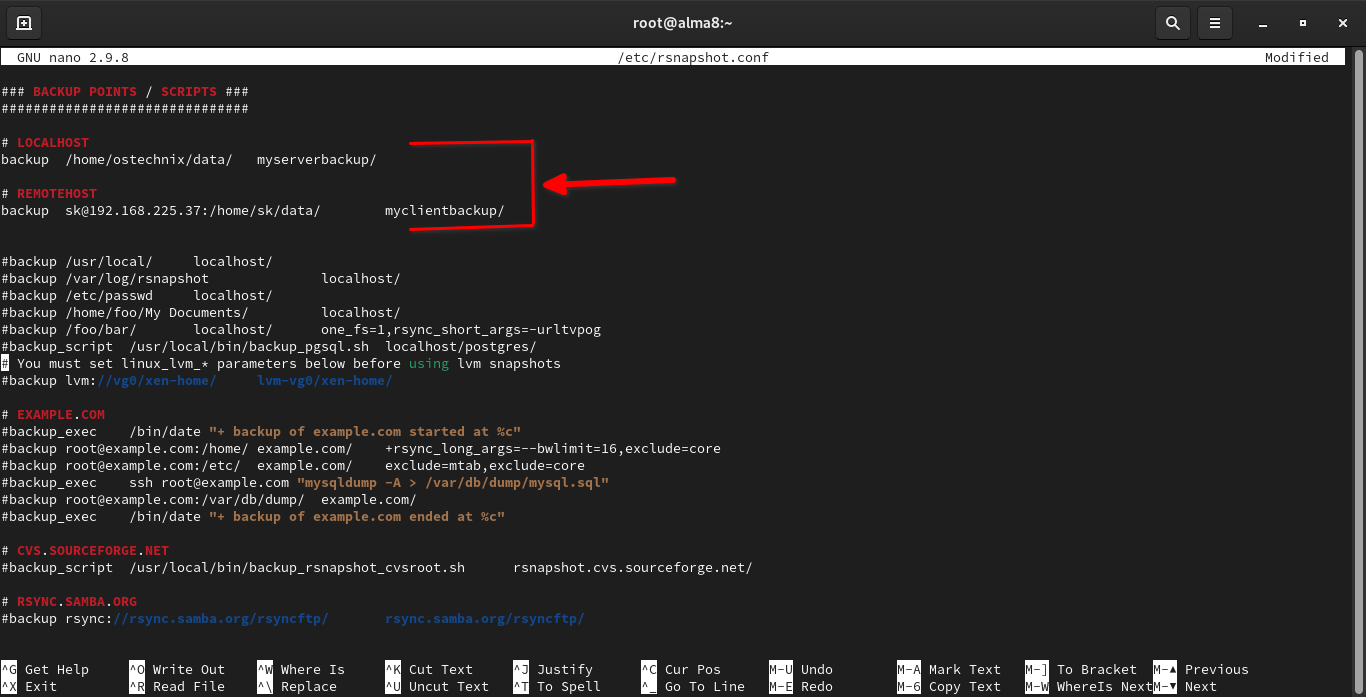
Finally, you need to define the directories that you want to backup. Find the following directives in your rsnapshot config file and set the backup directory locations.
###############################
### BACKUP POINTS / SCRIPTS ###
###############################

# LOCALHOST
backup /home/ostechnix/data/ myserverbackup/
Here, I am going to backup the contents of /home/ostechnix/data/ directory and save them in /rsnapbackup/myserverbackup/ directory.
Heads Up: Please note that I didn't specify the full path (i.e. /rsnapbackup/myserverbackup/) in the above configuration. Because, we already mentioned the Root backup directory earlier. So we don't need to specify Rsnapshot root directory here.
Likewise, define the your remote client systems backup location.
# REMOTEHOST
backup sk@192.168.225.37:/home/sk/data/ myclientbackup/
Here, I am going to backup the contents of my remote client system's /home/sk/data/ directory and save them in /rsnapbackup/myclientbackup/ directory in my Backup server.
Again, please note that I didn't specify the full path (/rsnapbackup/myclientbackup/ ) in the above configuration. Because, we already defined the Root backup directory.
Save and close /etc/rsnapshot.conf file.
Once you have made all your changes, run the following command to verify that the config file is syntactically valid.
$ rsnapshot configtest
If all is well, you will see the following output.
Syntax OK
3.3. Start backups
Run the following command to manually start backup using Rsnapshot.
# rsnapshot alpha
The first backup will take a few minutes to several hours depending upon the size of backups. The subsequent backups will be much faster, because Rsnapshot will only backup the differences.
Similarly, you can start other backup levels:
# rsnapshot beta
# rsnapshot gamma
# rsnapshot daily
3.4. Verifying and viewing backups
Let us check whether the backups are really stored in the Root backup directory in the Backup server.
# ls /rsnapbackup/
You will see the following output:
alpha.0
Check the contents of alpha.0 directory:
# ls /rsnapbackup/alpha.0/
You will see there are two directories automatically created, one for local backup (myserverbackup), and another one for remote systems (myclientbackup).
myclientbackup myserverbackup
To check the client system backups, run:
# ls /rsnapbackup/alpha.0/myclientbackup/
Check the server system(local system) backups:
# ls /rsnapbackup/alpha.0/myserverbackup/
When you run Rnaspshot each, it will create new directories such as alpha.0, alpha.1 and so on, depending on the number of retain levels you configured.
# ls /rsnapbackup/
alpha.0  alpha.1
The alpha.0 directory will contain the most recent backup.
3.5. Schedule backups
You don't need to run the rsnapshot command to create backups every time. Just define a cron job to automate the backup jobs at regular interval.
To do so, create a new cron job file for rsnapshot:
# nano /etc/cron.d/rsnapshot
Add the following lines:
0 */4 * * *     /usr/bin/rsnapshot alpha
50 23 * * *     /usr/bin/rsnapshot beta
00 22 1 * *     /usr/bin/rsnapshot delta
The first line indicates that there will be six alpha snapshots taken each day (at 0,4,8,12,16, and 20 hours), beta snapshots taken every night at 11:50pm, and delta snapshots will be taken at 10pm on the first day of each month. You can adjust timing as per your wish. Save and close the file.
Done! From now on, Rsnapshot will automatically backup your data at the defined time.
For more details, refer the man pages.
# man rsnapshot
4. Restore files
Restoring files is easy! If you have sudo or root access on the backup server, you can simply copy the files from the Rsnapshot root directory i.e. /rsnapbackup/.
5. Conclusion
Setting up a backup server with Rsnapshot in Linux is not that difficult. The initial configuration may seem hard and take a little bit time. But once you setup the Rsnapshot backup server correctly, it will work out of the box forever, without any user intervention.
Resources:
Related read:
- How To Backup Your Entire Linux System Using Rsync
- How To Backup Files And Directories Using Rsync In Linux
- How To Backup And Restore Files Using Deja Dup In Linux
- How To Backup And Restore Linux System With Timeshift
- How To Synchronize Files With Unison On Linux
- How To Synchronize Local And Remote Directories In Linux
- How To Synchronize Files And Directories Using Zaloha.sh
- CYA – System Snapshot And Restore Utility For Linux
- Restic – A Fast, Secure And Efficient Backup Application


6 comments
gracias, excelente tutorial y muy bien explicado
thanks a lot
De nada.
Don’t get confused with VMware and Storage based snapshots. This is more or less a point in time backup of the system to another onsite/offsite machine. This is great if you have physical machines, and used this process in the 90’s. Now in the Virtual world and with Smarter storage systems this is now redundant.
Thank you, it helped me setup rsnapshot on Debian!
says unable to locate package rsnapshot
What is your Linux distribution name and version? Rsnapshot is available for most Linux distributions.