This step-by-step tutorial explains how to install Anaconda Python distribution on Linux operating system. For those wondering, Anaconda Python distribution is a free, cross-platform and open source distribution of Python and R programming languages. It is used for data science, machine learning, large-scale data processing and predictive analytics etc. Anaconda comes in two editions, free and paid enterprise versions.
Anaconda distribution enables the data scientists to:
- download a collection of over 1500+ Python and R data science packages,
- manage libraries, packages and virtual environments,
- develop and train machine learning and deep learning models,
- analyze data,
- and visualize results using various tools.
Anaconda ships a command line package and virtual environment manager called Conda, which is used to manage and deploy applications, environments and packages. Conda was created for Python packages, however it can be used for any languages.
Using Conda utility, we can,
- Create new Conda environments,
- Install packages into specified Conda environment,
- List packages in a Conda environment,
- Update conda packages,
- Search for packages,
- Clean unused packages,
- Remove packages from environments,
- And more.
It also includes Anaconda Navigator, a graphical alternative for those who are not comfortable with the command line interface.
Table of Contents
Install Anaconda Python Distribution On Linux
For the purpose of this guide, I will be using Python 3 version of Anaconda. You can use Python 2.7 version, but it is not officially supported anymore. Many projects have already dropped Python 2 support, so I suggest you to use Python 3.x. Python comes pre-installed on many Linux operating systems including Ubuntu. I tested it on Ubuntu 18.04 desktop edition, however the steps given below should work on most Linux distributions.
First, make sure you've installed all necessary prerequisites for Anaconda.
On Arch Linux and its variants, run the following command to install all required prerequisites:
$ sudo pacman -S libxau libxi libxss libxtst libxcursor libxcomposite libxdamage libxfixes libxrandr libxrender mesa-libgl alsa-liblibglvnd
On Debian, Ubuntu, Linux Mint:
$ sudo apt-get install libgl1-mesa-glx libegl1-mesa libxrandr2 libxrandr2 libxss1 libxcursor1 libxcomposite1 libasound2 libxi6 libxtst6
On RHEL, CentOS:
$ sudo yum install libXcomposite libXcursor libXi libXtst libXrandr alsa-lib mesa-libEGL libXdamage mesa-libGL libXScrnSaver
On openSUSE:
$ sudo zypper install libXcomposite1 libXi6 libXext6 libXau6 libX11-6 libXrandr2 libXrender1 libXss1 libXtst6 libXdamage1 libXcursor1 libxcb1 libasound2 libX11-xcb1 Mesa-libGL1Mesa-libEGL1
After installing the prerequisites, download latest Anagonda Installer depending upon your Linux distribution's architecture from the official download page. I am on 64-bit OS, hence I downloaded the 64-bit installer using the following command:
$ wget https://repo.anaconda.com/archive/Anaconda3-2019.10-Linux-x86_64.sh
Check the integrity of the downloaded file:
$ sha256sum Downloads/Anaconda3-2019.10-Linux-x86_64.sh
46d762284d252e51cd58a8ca6c8adc9da2eadc82c342927b2f66ed011d1d8b53 Downloads/Anaconda3-2019.10-Linux-x86_64.sh
Compare it with the official Hashes for Anagonda. If the hash value of the locally downloaded installer file matches with the official hash, you're good to go.
Now, install Anaconda for Python 3.7 using command:
$ bash ~/Downloads/Anaconda3-2019.10-Linux-x86_64.sh
Include the bash command regardless of the shell you're using. Replace ~/Downloads/ with the path to the file you downloaded.
The installer prompts you to press ENTER to continue installation.
Welcome to Anaconda3 2019.10

In order to continue the installation process, please review the license
agreement.
Please, press ENTER to continue
>>>
Press ENTER key to scroll to the bottom of the license terms and type “Yes” and press to agree the license agreement and continue installation.
Please answer 'yes' or 'no':'
>>> yes
Next the installer asks where do you want to install Anaconda. You will be given three choices. Press ENTER to accept the default install location. Press CTRL+C to cancel the installation or mention an alternate installation directory. I with the default installation path, which is /home/sk/anaconda3 in my case.
Anaconda3 will now be installed into this location:
/home/sk/anaconda3

- Press ENTER to confirm the location
- Press CTRL-C to abort the installation
- Or specify a different location below

[/home/sk/anaconda3] >>>
If you choose the default location, the installer displays “PREFIX=/home/<user>/anaconda<2 or 3>” and continues the installation. It may take a few minutes to complete.
Next you will be prompted to initialize Anaconda. It is recommended to initialize it, so just type Yes and press ENTER to continue.
Preparing transaction: done
Executing transaction: done
installation finished.
Do you wish the installer to initialize Anaconda3
by running conda init? [yes|no]
[no] >>>  yes
Finally, you will see “Thank you for installing Anaconda3!” message if the installation is successful.
[...]
no change /home/sk/anaconda3/condabin/conda
no change /home/sk/anaconda3/bin/conda
no change /home/sk/anaconda3/bin/conda-env
no change /home/sk/anaconda3/bin/activate
no change /home/sk/anaconda3/bin/deactivate
no change /home/sk/anaconda3/etc/profile.d/conda.sh
no change /home/sk/anaconda3/etc/fish/conf.d/conda.fish
no change /home/sk/anaconda3/shell/condabin/Conda.psm1
no change /home/sk/anaconda3/shell/condabin/conda-hook.ps1
no change /home/sk/anaconda3/lib/python3.7/site-packages/xontrib/conda.xsh
no change /home/sk/anaconda3/etc/profile.d/conda.csh
modified /home/sk/.bashrc

==> For changes to take effect, close and re-open your current shell. <==

If you'd prefer that conda's base environment not be activated on startup,
set the auto_activate_base parameter to false:

conda config --set auto_activate_base false

Thank you for installing Anaconda3!

===========================================================================

Anaconda and JetBrains are working together to bring you Anaconda-powered
environments tightly integrated in the PyCharm IDE.

PyCharm for Anaconda is available at:
https://www.anaconda.com/pycharm

For the installation to take effect, close and re-open your Terminal. Alternatively, run the following command:
$ source ~/.bashrc
You will now see the prefix (base) in front of your shell prompt. It means that the conda's base environment is activated.

If you don't want it activated by default and wish to run conda from anywhere, run the following command:
$ conda config --set auto_activate_base false
$ source ~/.bashrc
Now you won't see the prefix (base) in your shell prompt.
Verify Anaconda installation
Run the following command from the Terminal to verify Anaconda installation.
$ conda list
If Anaconda is properly installed and working, you will see list of installed packages and their versions as show in the following output.
Sample output:
# packages in environment at /home/sk/anaconda3:
#
# Name Version Build Channel
_ipyw_jlab_nb_ext_conf 0.1.0 py37_0
_libgcc_mutex 0.1 main
alabaster 0.7.12 py37_0
anaconda 2019.10 py37_0
anaconda-client 1.7.2 py37_0
anaconda-navigator 1.9.7 py37_0
anaconda-project 0.8.3 py_0
.
.
.
zeromq                    4.3.1                he6710b0_3
zict                      1.0.0                      py_0
zipp                      0.6.0                      py_0
zlib                      1.2.11               h7b6447c_3
zstd                      1.3.7                h0b5b093_0

You can also verify the installation by entering into the Python shell. To do so, simply type:
$ python
This command runs the Python shell. If Anaconda is installed and working, it will display "Anaconda, Inc." message as shown in the below output.
Python 3.7.4 (default, Aug 13 2019, 20:35:49)
[GCC 7.3.0] :: Anaconda, Inc. on linux
Type "help", "copyright", "credits" or "license" for more information.
>>>

To exit the Python shell and go back to your shell prompt, enter the following command:
quit()
To know more about Conda commands and options, check man pages.
$ man conda
We can manage packages and environments from command line using Conda. If you're a newbie, use Anaconda Navigator GUI.
To launch Anaconda Navigator graphical interface, run the following command from your Terminal:
$ anaconda-navigator
The default interface of Anaconda Navigator will look like below.
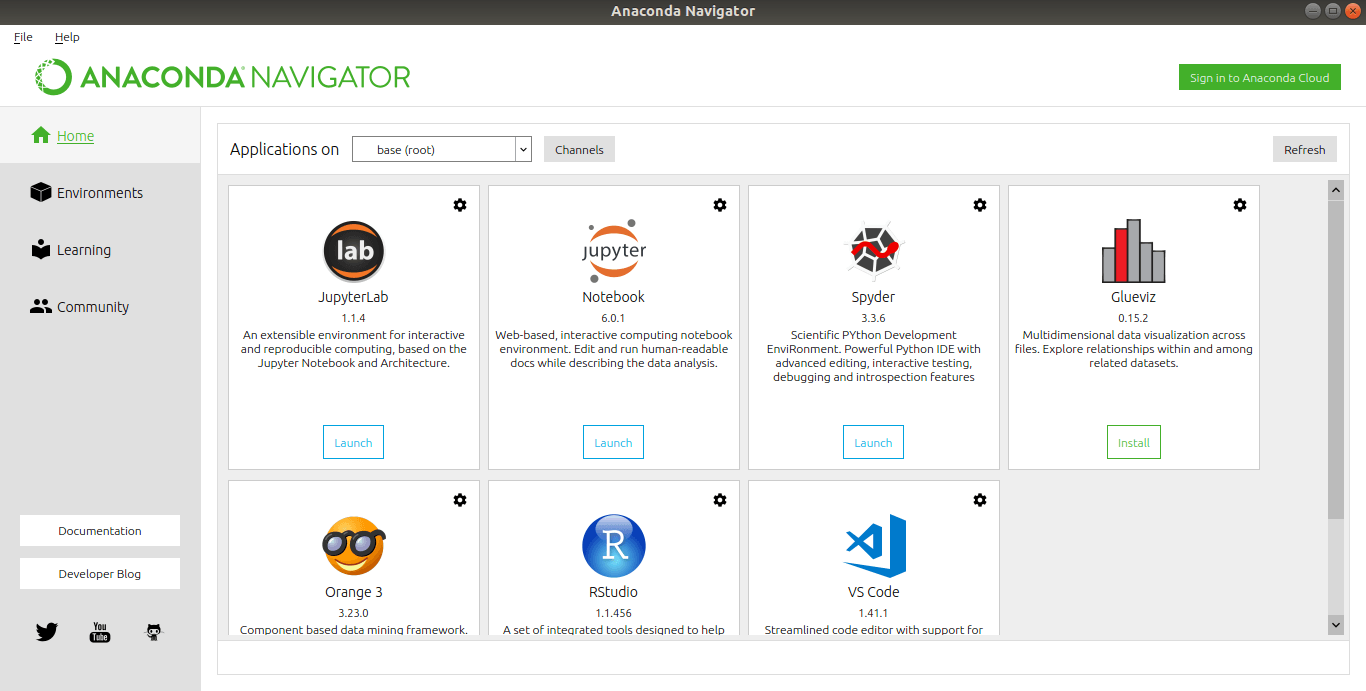
As you can see, the Anaconda navigator includes the following IDEs by default.
- JupyterLab,
- Jupyter Notebook,
- Spyder,
- Glueviz,
- Orange,
- RStudio,
- Visual Studio Code.
You can use them to write, run and debug your code.
Anaconda installs most recent IDEs. You can, however, install a specific version. To do so, click the gear button next to the IDE and choose "Install specific version".
If you don't want any IDE application, click gear button and choose "Remove application" option.
By default, only one environment named base is available. You can also create a new environment. To do so, click the Environments tab on the left pane and click "Create" button on the bottom. Next, enter the name of the environment, choose the Python version (E.g. 3.7) and click Create button.

There are two other tabs namely "Learning" and Community" available on the left pane that helps you to find learning materials (documents and videos) to learn data science and machine learning.
Run a simple Python program
From command line:
Go to the Python shell:
$ python
You will see >>> sign. It means you're in Python. Type your code.
For example, I type the following code:
print("Welcome to OSTechNix")When you hit ENTER, you will "Welcome to OSTechNix message".

Using graphical IDEs
As I already mentioned, Anaconda ships with 7 IDEs by default for writing, running and debugging your programs. I am going to use Spyder, short for Scientific Python Development Environment. Launch Spyder from Anaconda Navigator home screen.

This is how Spyder IDE application looks like.

As you can see, there are two panes. The left pane is the code editor where you can write your code. The right pane is called iPython console which gives you access to the Python interactive mode.
Let us write a simple program.
Go to File -> New file from menu bar. Type your code in the code editor. Save it any location of your choice. Then click Run button in tool bar or go to Run -> Run from menu bar or press F5. You will see the result in iPython console.
For more details to know how to use Spyder, refer the help section. There is butto named help avialble above the iPython console or go to the online help section.
Update Anaconda
Verify currently installed Conda version:
$ conda info

active environment : base
active env location : /home/sk/anaconda3
shell level : 1
user config file : /home/sk/.condarc
populated config files : /home/sk/.condarc
conda version : 4.7.12
conda-build version : 3.18.9
python version : 3.7.4.final.0
virtual packages :
base environment : /home/sk/anaconda3 (writable)
channel URLs : https://repo.anaconda.com/pkgs/main/linux-64
https://repo.anaconda.com/pkgs/main/noarch
https://repo.anaconda.com/pkgs/r/linux-64
https://repo.anaconda.com/pkgs/r/noarch
package cache : /home/sk/anaconda3/pkgs
/home/sk/.conda/pkgs
envs directories : /home/sk/anaconda3/envs
/home/sk/.conda/envs
platform : linux-64
user-agent : conda/4.7.12 requests/2.22.0 CPython/3.7.4 Linux/5.3.0-26-generic ubuntu/18.04.3 glibc/2.27
UID:GID : 1000:1000
netrc file : None
offline mode : False
To update the Conda to the current version, run:
$ conda update -n base conda
Update all packages to the latest version of Anaconda:
$ conda update anaconda
Uninstall Anaconda
If you don't use Anaconda anymore, remove it from your system as shown below.
First, you need to Install "anaconda-clean" module to completely uninstall Anaconda from your system.
$ conda install anaconda-clean
Next, run the following command to remove Anaconda:
$ anaconda-clean --yes
This will create a backup directory called .anaconda_backup in your $HOME directory.
Backup directory: /home/sk/.anaconda_backup/2020-01-24T183205
And then, delete the entire Anaconda directory and the backup directory using commands:
$ rm -fr ~/anaconda3/
$ rm -fr ~/.anaconda_backup/
Finally, delete all Anaconda entries from your ~/.bashrc file:
$ nano ~/.bashrc
The following lines were added in my Ubuntu box and I deleted them. Double check the lines before deleting them.
[..]
# >>> conda initialize >>>
# !! Contents within this block are managed by 'conda init' !!
__conda_setup="$('/home/sk/anaconda3/bin/conda' 'shell.bash' 'hook' 2> /dev/null)"
if [ $? -eq 0 ]; then
    eval "$__conda_setup"
else
    if [ -f "/home/sk/anaconda3/etc/profile.d/conda.sh" ]; then
        . "/home/sk/anaconda3/etc/profile.d/conda.sh"
    else
        export PATH="/home/sk/anaconda3/bin:$PATH"
    fi
fi
unset __conda_setup
# <<< conda initialize <<<
Run the following command to take effect the changes:
$ source ~/.bashrc
Hope this helps. Anaconda is a vast topic and we covered only the installation part and basic usage. I recommended you to go through Anaconda getting started guide to learn more about Anaconda usage.
Resource:
Thanks for stopping by!
Help us to help you:
- Subscribe to our Email Newsletter : Sign Up Now
- Support OSTechNix : Donate Via PayPal
- Download free E-Books and Videos : OSTechNix on TradePub
- Connect with us: Reddit | Facebook | Twitter | LinkedIn | RSS feeds
Have a Good day!!