This guide explains how to install Nim programming language on Linux. For those wondering, Nim is an opensource, imperative, multi-paradigm and compiled programming language that can be used to write easy-to-read high performance code. It is a relatively new programming language and combines successful concepts from mature languages like Python, Ada and Modula. Nim supports all major operating systems including Linux, BSD, macOS and Microsoft Windows.
Table of Contents
Install Nim Programming Language In Linux
Before installing Nim, make sure you have done the following prerequisites.
Nim compiler requires a C compiler in order to compile the code. So you should install clang or gcc compilers in your Linux system. Refer the following link to install gcc compiler and other development tools in Linux.
Nim can be installed in multiple ways. Here are three different ways to install Nim on Linux.
1. Install Nim using Choosenim (Officially recommended)
The officially recommended way to install Nim is to use Choosenim. Similar to rustup and pyenv, the choosenim is a toolchain multiplexer. It helps the users to install multiple versions of Nim compiler along with all required tools. You can then easily switch between different Nim versions and choose any Nim version on-demand.
After installing the gcc compiler, run the following command to install the latest stable Nim version using choosenim toolchain installer.
$ curl https://nim-lang.org/choosenim/init.sh -sSf | sh
Follow the onscreen instructions. First, you will be asked if you'd like to allow Choosenim to record and send anonymised telemetry data. If you agree to send data, press 'y' and hit ENTER. If you don't want, press 'n'.
choosenim-init: Downloading choosenim-0.6.0_linux_amd64
Prompt: Can choosenim record and send anonymised telemetry data? [y/n]
... Anonymous aggregate user analytics allow us to prioritise
... fixes and features based on how, where and when people use Nim.
... For more details see: https://goo.gl/NzUEPf.
After the successful installation, you will see the following message.
Downloading Nim 1.0.6 from nim-lang.org
[##################################################] 100.0% 0kb/s
 Extracting nim-1.0.6-linux_x64.tar.xz
   Building Nim 1.0.6
  Compiler: Already built
     Tools: Already built
  Installed component 'nim'
  Installed component 'nimble'
  Installed component 'nimgrep'
  Installed component 'nimpretty'
  Installed component 'nimsuggest'
  Installed component 'testament'
   Switched to Nim 1.0.6
choosenim-init: ChooseNim installed in /home/sk/.nimble/bin
choosenim-init: You must now ensure that the Nimble bin dir is in your PATH.
choosenim-init: Place the following line in the ~/.profile or ~/.bashrc file.
choosenim-init:     export PATH=/home/sk/.nimble/bin:$PATH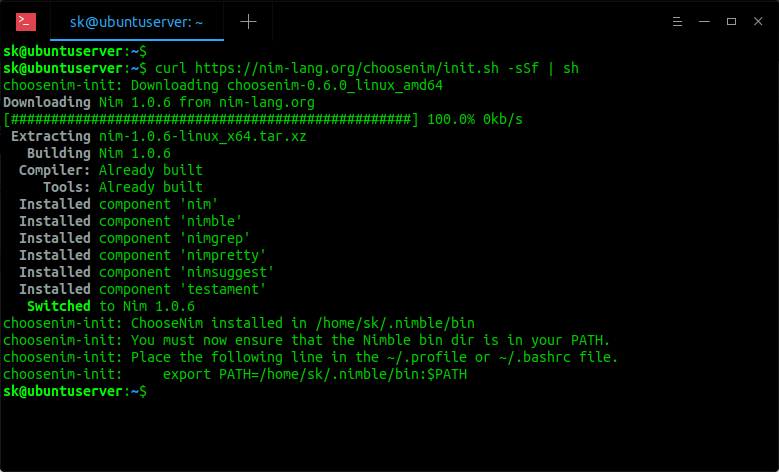
As you can see, nim and other required components have been installed in ~/.nimble/bin directory. You should make sure the Nimble bin directory is added in your $PATH. To do so, edit ~/.bashrc or ~/.profile file:
$ nano ~/.bashrc
Or,
$ nano ~/.profile
Add the following line in it:
export PATH=/home/sk/.nimble/bin:$PATH
Replace "/home/sk/..." path with your own.
Finally update the changes using command:
$ source ~/.bashrc
If you have added that line in ~/.profile, do:
$ source ~/.profile
To check the installed Nim version, simply run:
$ nim -v
As writing this guide, the latest stable Nim version was 1.0.6.
Nim Compiler Version 1.0.6 [Linux: amd64]
Compiled at 2020-01-23
Copyright (c) 2006-2019 by Andreas Rumpf

active boot switches: -d:release
Switch to Nim development version
By default, choosenim will install download and install latest stable Nim version. If you want to install development version, run:
$ choosenim devel
Sample output:
Downloading Nim devel from GitHub
[##################################################] 100.0% 0kb/s
Extracting nim-1.1.1-linux_x64.tar.xz
Setting up git repository
Building Nim #devel
Compiler: Already built
Tools: Already built
Switched to Nim #devel
Verify the Nim version:
$ nim -v
Nim Compiler Version 1.1.1 [Linux: amd64]
Compiled at 2020-04-02
Copyright (c) 2006-2020 by Andreas Rumpf

active boot switches: -d:release
To switch back to stable version, run:
$ choosenim stable
Switched to Nim 1.0.6
List available Nim versions
To view the list of all available Nim versions, run:
$ choosenim versions
Sample output:
   Channel: stable

 Installed:
          * 1.0.6 (latest)
            #devel

 Available:
            1.0.4
            1.0.2
            1.0.0
            0.20.2
            0.20.0
            0.19.6
            0.19.4
            0.19.2
            0.19.0
            0.18.0
            0.17.2
            0.17.0
            0.16.0
The above commands shows the list of installed Nim versions and available Nim versions.
Install Specific Nim version
If you want a specific Nim version for your project, you can install it like below.
$ choosenim 1.0.4
This command Installs and selects version 1.0.4 of Nim.
Update Nim
Nim can be updated like below.
Nim stable:
$ choosenim update stable
Nim development version:
$ choosenim update devel
Update a specific Nim version:
$ choosenim update 1.0.6
To update choosenim itself, run:
$ choosenim update self
For help,
$ choosenim -h
Sample output:
choosenim: The Nim toolchain installer.

Choose a job. Choose a mortgage. Choose life. Choose Nim.

Usage:
  choosenim <version/path/channel>

Example:
  choosenim 0.16.0
    Installs (if necessary) and selects version 0.16.0 of Nim.
  choosenim stable
    Installs (if necessary) Nim from the stable channel (latest stable release)
    and then selects it.
  choosenim devel [--latest]
    Installs (if necessary) and selects the most recent nightly build of Nim.
    The '--latest' flag selects and builds the latest commit in the devel branch
  choosenim ~/projects/nim
    Selects the specified Nim installation.
  choosenim update stable
    Updates the version installed on the stable release channel.
  choosenim update devel [--latest]
    Updates to the most recent nightly build of Nim.
    The '--latest' flag updates and builds the latest commit in the devel branch
  choosenim versions [--installed]
    Lists the available versions of Nim that choosenim has access to.

Channels:
  stable
    Describes the latest stable release of Nim.
  devel
    Describes the latest development (or nightly) release of Nim taken from
    the devel branch.

Commands:
  update    <version/channel>    Installs the latest release of the specified
                                 version or channel.
  show                           Displays the selected version and channel.
  update    self                 Updates choosenim itself.
  versions  [--installed]        Lists available versions of Nim, passing
                                 `--installed` only displays versions that
                                 are installed locally (no network requests).

Options:
  -h --help             Show this output.
  -y --yes              Agree to every question.
  --version             Show version.
  --verbose             Show low (and higher) priority output.
  --debug               Show debug (and higher) priority output.
  --noColor             Don't colorise output.

  --choosenimDir:<dir>  Specify the directory where toolchains should be
                        installed. Default: ~/.choosenim.
  --nimbleDir:<dir>     Specify the Nimble directory where binaries will be
                        placed. Default: ~/.nimble.
  --firstInstall        Used by install script.
2. Install Nim using your distribution's package manager
Nim is packaged for many popular Linux distributions and is available in the official repositories.
On Arch Linux and its variants like Manjaro Linux, run the following command to install Nim:
$ sudo pacman -S nim
On Debian, Ubuntu and derivatives:
$ sudo apt install nim
On Fedora:
$ sudo dnf install nim
On openSUSE:
$ sudo zypper install nim
On Void Linux:
$ xbps-install -S nim
Nim is also available as snap package. If your Linux distribution has Snapd, install Nim like below.
Latest stable release:
$ snap install nim-lang --classic
Latest LTS 1.0.x release:
$ snap install nim-lang-lts-1 --classic
Latest nightly build:
$ snap install nim-lang-nightly --classic
Please note that Nim version in official repositories might be bit old. If you want most recent version, use choosenim installer as described in the previous method.
3. Install Using Docker
The community managed Nim Docker images are available on Docker Hub. To run those images, install Docker on your Linux system.
After installing Docker, get the latest stable Nim Docker image using command:
$ docker pull nimlang/nim
Get latest development version:
$ docker pull nimlang/nim:devel
Test Nim Programming language
To verify if Nim installation is successfully installed, let us run a simple program with Nim.
Create a text file, for example ostechnix.nim:
$ nano ostechnix.nim
Add the following line in it:
echo "Welcome To OSTechNix!"
Save and close the file.
Compile the file using command:
$ nim c ostechnix.nim
Sample output:
Hint: used config file '/home/sk/.choosenim/toolchains/nim-1.0.6/config/nim.cfg' [Conf]
Hint: system [Processing]
Hint: widestrs [Processing]
Hint: io [Processing]
Hint: ostechnix [Processing]
Hint: gcc -c  -w  -I/home/sk/.choosenim/toolchains/nim-1.0.6/lib -I/home/sk -o /home/sk/.cache/nim/ostechnix_d/stdlib_io.nim.c.o /home/sk/.cache/nim/ostechnix_d/stdlib_io.nim.c [Exec]
Hint: gcc -c  -w  -I/home/sk/.choosenim/toolchains/nim-1.0.6/lib -I/home/sk -o /home/sk/.cache/nim/ostechnix_d/stdlib_system.nim.c.o /home/sk/.cache/nim/ostechnix_d/stdlib_system.nim.c [Exec]
Hint: gcc -c  -w  -I/home/sk/.choosenim/toolchains/nim-1.0.6/lib -I/home/sk -o /home/sk/.cache/nim/ostechnix_d/@mostechnix.nim.c.o /home/sk/.cache/nim/ostechnix_d/@mostechnix.nim.c [Exec]
Hint:  [Link]
Hint: operation successful (14483 lines compiled; 1.894 sec total; 16.008MiB peakmem; Debug Build) [SuccessX]
Finally, run the program using command:
$ ./ostechnix
Sample output:
Welcome To OSTechNix!

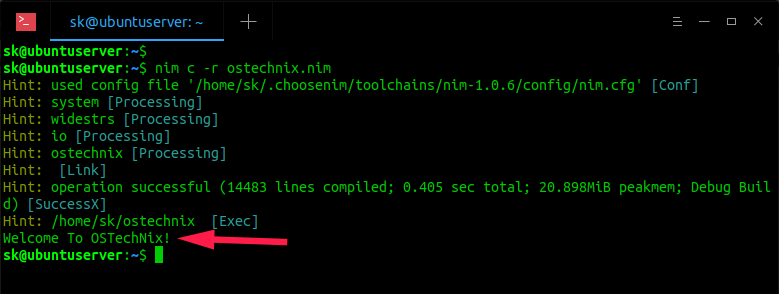
Alternatively, compile and run in one go like below:
$ nim c -r ostechnix.nim
Sample output:
Hint: used config file '/home/sk/.choosenim/toolchains/nim-1.0.6/config/nim.cfg' [Conf]
Hint: system [Processing]
Hint: widestrs [Processing]
Hint: io [Processing]
Hint: ostechnix [Processing]
Hint: [Link]
Hint: operation successful (14483 lines compiled; 0.405 sec total; 20.898MiB peakmem; Debug Build) [SuccessX]
Hint: /home/sk/ostechnix [Exec]
Welcome To OSTechNix!
To know more about Nim usage, refer the official Nim basics documentation at the end.
Uninstall Nim
If you have installed Nim with choosenim, just remove the Nim installation directories:
$ rm -r ~/.nimble/ ~/.choosenim/
If you have installed it using your distribution's package manager, just run the uninstall command. For example, on Debian, Ubuntu, Nim can be removed using the following command:
$ sudo apt-get purge --auto-remove nim
Hope this helps.
Resources:
2 comments
Small typo:
“Create a text file, for example ostechni.nim:”
s/ostechni.nim/ostechnix.nim/
Thanks. Fixed it.