This guide gives you a brief introduction to Steganography, and hide files inside images using different methods and tools in Linux.
Table of Contents
What Is Steganography?
Steganography is a process of hiding a file, an image, a video, a text inside another file. As mentioned in Wikipedia, Steganography is the combination of two Greek words, steganos which means "covered, concealed, or protected", and graphein which means "writing".
The sources said that this method was first followed by Histiaeus, an ancient Greek king, back in 440BC. He shaved his most trusted servant's head, and marked the secret message onto his head.
After the hair had regrown, he sent that servant to one of his Vassal to convey the message that has some information about the upcoming attack to Greece.
Now, in the modern age, Steganography has been evolved, much improved and widely used to send and receive digital secret messages by concealing them into another files.
For more details about Steganography, refer this link. Let us now see how to hide files inside images in Linux.
Disclaimer:
Steganography is a vast topic. This tutorial only covers how to hide files inside images, which is the core concept of Steganography. Please do not assume that this can't be broken by any security experts. The method described here is very basic, so even an intermediate security professional can easily break it in couple hours. This steps described below are purely for educational purpose. We are not responsible for any kind of misuse.
Hide Files Inside Images In Linux
We can hide files inside images in different methods. Here I have given 5 methods.
Method 1
This method doesn't require any additional software. Just a basic Linux command line knowledge is enough.
I have one image file called image.jpg and a directory called sk. Inside this directory, there is a file called secret.txt which has some confidential message. This is the file that we are going to embed in the image.jpg file. You can place any number of files you want to hide inside this directory.
Then, I am going to compress the directory sk and save it as secret.zip to make it as single file. Finally, I will concatenate the zip file (secret.zip) and image file (image.jpg) using cat command and save it as ostechnix.jpg.
To put things more clearly,
- image.jpg - A random image file.
- sk - The directory that contains all secret files.
- secret.zip - Archive of sk directory.
- ostechnix.jpg - The output image file that contains both secret.zip and image.jpg.
Step 1: Put the image file and the directory in a folder. I have put them both in Documents folder.
Step 2: Move all files you want to hide inside the folder "sk". Then, compress this folder and save it as "secret.zip". To compress the folder, just right click on it, and select compress.
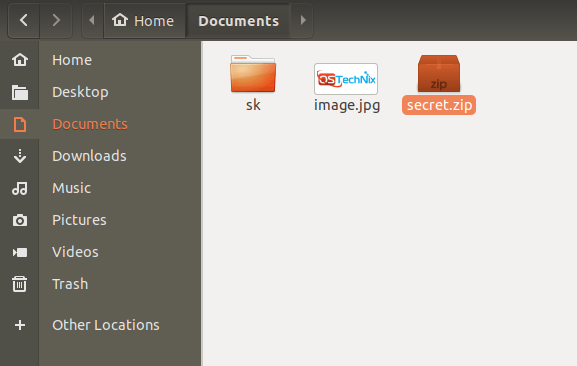
Step 3: Next open the Terminal. Go to the location where you have stored the zip and image files (In our case it is Documents). Finally, concatenate the secret.zip and test.jpg files, and save them as ostechnix.jpg using cat command.
$ cd Documents
$ cat image.jpg secret.zip > ostechnix.jpg

Concatenate files
That's it. We have now hidden the confidential files inside ostechnix.jpg. It is the important file. Just delete all other files except ostechnix.jpg.
The ostechnix.jpg will look like an ordinary image file and anyone can view it using any image viewer application. But, they might not know this file has some confidential file in it.
To view the hidden files inside the image file ostechnix.jpg, just uncompress it using the following command:
$ unzip ostechnix.jpg
Or,
$ unzip -t ostechnix.jpg
Sample output:
Archive:  ostechnix.jpg
warning [ostechnix.jpg]:  712139 extra bytes at beginning or within zipfile
  (attempting to process anyway)
   creating: sk/
  inflating: sk/secret.txt

Unzip image file
As you see in the above output, the directory sk that has secret files inside has been extracted. Now, go back to the folder and check the contents. You will see all the files in there.
One disadvantage of this method is we can't add any passphrase to the image file. No worries! In the following methods, we can add passphrase to the output files.
Method 2 - using Steghide
Steghide is a command line utility that helps us to hide the confidential data inside an image or audio file. It supports JPEG, BMP, WAV and AU files.
Steghide is available in the default repositories of many Linux distributions.
On Arch Linux and its variants, you can install it using command:
$ sudo pacman -S steghide
On Debian, Ubuntu:
$ sudo apt install steghide
Now you can hide your confidential file inside an image or audio like below. I assume you have put the confidential file that you want to encrypt and the the image or audio file in the same folder. If you put them in the different folder, you need to give the full path in the following command.
$ steghide embed -ef secret.txt -cf ostechnix.jpg
You will be asked to enter a passphrase.
Enter passphrase:
Re-Enter passphrase:
embedding "secret.txt" in "ostechnix.jpg"... done

Hide files into image using Steghide
In the above example, I have embedded a text file named secret.txt into an image file named ostechnix.jpg. You can now delete the original secret.txt file. Because, we just embedded inside an image file. If you want to embed multiple files, put them in one folder and zip it and then hide it as described above.
To extract the secret file from the image, simply run:
$ steghide extract -sf ostechnix.jpg
Enter the passphrase to extract it:
Enter passphrase:
wrote extracted data to "secret.txt".

Extract files from image using steghide
For more details, refer man pages,
$ man steghide
Method 3 - using Outguess
Outguess is yet another command line stegnographic tool to hide confidential files inside an image. Currently, it supports the PPM, PNM, and JPEG image formats.
To install it on Debian, Ubuntu and other DEB-based systems, run:
$ sudo apt install outguess
Once installed, go to the location where you have kept secret file and the image and embed the secret file into the image using the following command:
$ outguess -d secret.txt ostechnix.jpg output.jpg
Sample output:
Reading ostechnix.jpg....
JPEG compression quality set to 75
Extracting usable bits: 158203 bits
Correctable message size: 77641 bits, 49.08%
Encoded 'secret.txt': 160 bits, 20 bytes
Finding best embedding...
0: 88(45.8%)[55.0%], bias -17(-0.19), saved: -1, total: 0.06%
1: 90(46.9%)[56.2%], bias -27(-0.30), saved: -1, total: 0.06%
12: 85(44.3%)[53.1%], bias -36(-0.42), saved: 0, total: 0.05%
26: 91(47.4%)[56.9%], bias -45(-0.49), saved: -1, total: 0.06%
174: 87(45.8%)[54.4%], bias -48(-0.55), saved: 0, total: 0.05%
174, 39: Embedding data: 160 in 158203
Bits embedded: 190, changed: 87(45.8%)[54.4%], bias: -48, tot: 158844, skip: 158654
Foiling statistics: corrections: 77, failed: 6, offset: 864.696970 +- 310.577032
Total bits changed: 39 (change 87 + bias -48)
Storing bitmap into data...
Writing output.jpg....
Here, the output.jpg file is the one that has our confidential data file. keep it safe and delete everything else.
You can also add a passphrase to the output file like below.
$ outguess -k "my secret key" -d secret.txt ostechnix.jpg output.jpg
Replace "my secret key" with your own passphrase.
To extract the file, simply do:
$ outguess -r output.jpg secret.txt
Sample output:
Reading output.jpg....
Extracting usable bits: 158203 bits
Steg retrieve: seed: 174, len: 20
If you have used a passphrase, then use this command instead:
$ outguess -k "my secret key" -r output.jpg secret.txt
For more details, refer man pages.
$ man outguess
We have seen three command line utilities to hide files inside images or audio. If you don't like the command line way, here are two graphical steganographic tools.
Method 4 - using Stegosuite
Stegosuite is a graphical steganographic tool to hide files inside images. It is a free and open source steganography tool written in Java. It uses AES encryption method to embed data. It supports BMP, GIF and JPG image formats.
To install it on Debian, Ubuntu and other DEB-based systems, run:
$ sudo apt install stegosuite
Once installed, launch Stegosuite from Dash or Menu.

Stegosuite interface
Click File -> Open from the menu bar and choose an image that you want to use to hide the files. Then enter the message in the first column. Right click on the second column and choose "Add file..". Finally enter the passphrase on the third column.

Add files in stegosuite
Finally, click Embed button at the bottom of Stegosuite interface.

Embed files using stegosuite
Now a new image file will be created with name "filename_embed" in the same folder itself where you have chosen the image from. For instance, if you have selected the image called "image.jpg" from Documents folder, a new image file will be created with name "image_embed.jpg" in the Documents folder itself.
To extract the secret files from the image, just open it again in Stegosuite interface, enter the passphrase and click Extract button.

Extract files using stegosuite
All files will be extracted in the same folder itself.
For more details, refer Stegosuite website.
Method 5 - using Steg
Steg is a simple, cross platform, and graphical steganographic tool, written using C++ programming language. It is a portable software, so just download it, carry it anywhere and start using it in no-time, regardless of any operating system you use.
Steg supports JPEG, JPG, TIFF, PNG, and BMP image formats. It uses Steganography and Cryptography techniques to hide data inside compressed or uncompressed images.
Hide Files Inside Images With Steg
Click on this link to download the Steg application. It is available for both 32 and 64 bit architectures.
Or, Just use the following command to download it depending upon the architecture you use.
For 64 bit:
$ wget https://googledrive.com/host/0B-_yxJMDtRxyUExLZzZ3S2VDbjQ/steg-v1.0.0.2-linux64.tgz
For 32 bit:
$ wget https://googledrive.com/host/0B-_yxJMDtRxyRDNGNk1YcXR0UTg/steg-v1.0.0.2-linux32.tgz
After downloading, extract it using command:
$ tar -xvzf steg-v1.0.0.2-linux64.tgz
Go to Steg directory:
$ cd steg-v1.0.0.2-linux64/
And, type the following command to run it.
$ ./steg.sh
Click Yes to accept the license agreement.

Accept Eula
Click Ok to continue.

Steg Notification
This is how Steg application default interface looks like.

Steg Interface
Now, let us hide some data inside an image.
To do that, go to File -> Open generic image or Open JPEG image. Make sure you have chosen a big size image to store more data inside of it. The bigger image you choose, the more you can save inside the image.
After you open the image, the original image and modified image (output image) will be shown in left and right panels respectively. Also, It displays the available size to store data inside the image in the bottom right corner.

Hide Files Inside Images In Linux Using Steg
Now, go to Hide -> Hide Data from the top menu bar. Select the file you want to hide. Make sure the file you selected is smaller than the available space in the modified image. After adding the data, you will see a confirmation dialog box that says: Data successfully hidden.

Data Is Hidden
Here comes the important part. You can choose different encryption modes.
- Auto: Data will be encrypted, but you there is no PassPhrase or keys will be required to extract data.
- Symmetric: You have to give a PassPhrase to encrypt the data, and the recipient will need the same PassPhrase to extract it.
- Asymmetric unsigned: when you want to hide data (you are the sender) only the receiver's public key is required. When you want to extract data (you are the receiver) only your private key is required.
- Asymmetric signed: when you want to hide data (you are the sender) the receiver's public key and your private key are required. When you want to extract data (you are the receiver) only your private key is required but the sender's public key is requested. If you don't provide the sender's public key, at the end of the extraction process, you will be warned that the sender identity is not verified. If you provide the sender's public key you will be informed if sign verification is succeeded.
You can choose any cryptography methods of your choice.
To choose a specific cryptography method, go to Edit -> Configuration from the menu bar. The default cryptography method is auto. Also, you can embed some messages on the file if you want to.

Steg Options
Once everything is ok, click the Save button on the tool bar, and save it in any location you prefer.

Save Media
Done! The image data is encrypted inside the image. This image will look like a regular image. You can view it using any image viewer application.
To extract the hidden data, just open the encrypted image in Steg application. To do so, go to Extract -> Extract data from the menu bar.
Select the location where you want to save your data. Done!

Data Extraction
That's it. You will now be able to view the data.
As you can see, this is extremely easy to follow and doesn't require any special skills. Just open an image, hide some confidential data, and pass it along.
For more details about Steg, check the official website.
3 comments
Thanks for the tip it worked.
after using cat .. when i open the image the exe file wasn’t excuted
Wow it worked using steghide